Automate Deployment of Wowchemy Website onto GitHub Pages
This tutorial will assume that
- You have a repository containing the Wowchemy source code
- You have a GitHub Pages repository
- You have a general grasp of GitHub and git concepts (repos, pushing, etc.)
Resources for creating your Wowchemy website can be found at the Wowchemy website. For setting up your own (free) GitHub Pages repository, see the GitHub Pages Website. If you have neither of these pre-requisites done, go get them done and come back here. Don’t worry, I can wait. 😉
tl;dr
- Copy and edit Workflow YAML file
- Put Workflow YAML file in
.github/workflows/directory in Source repo - Create personal access token
- Store personal access token in secret in Source repo
- Push Source repo (with the Workflow YAML file)
- Watch GitHub do all the work for you
I talk about two primary repositories in this tutorial: a “Source” repo and a “Pages” repo.
- Source Repo: Contains the Hugo source files (markdown, config, etc.)
- Pages Repo: The directory from which a GitHub Pages website is deployed
Overview
This tutorial goes over how to take a website built using Wowchemy and host that website using a GitHub Pages website. This website you’re viewing right now is run using this exact process. The beauty of hosting it on GitHub Pages is that:
- It is free
- You can setup a custom domain name with it easily
- It integrates well with automated deployment
By default, GH Pages will suggest you use Jekyll for creating the website. I have nothing against using Jekyll to build a website, but the Wowchemy theme is great for, well, academics and researchers.
The way GitHub Pages sites work is that, assuming Jekyll files are not present, they will simply display any static website that is present in the repository. Thus, if we take the static site files that Hugo generates and then place them in the Pages repository, voila! We have a Hugo site deployed on GH Pages.
Technically you could do this process manually; on your local machine generate
the static site files in the Hugo Source repository, copy them to the GH Pages
repository, and git push that. But that’s a hassle and there’s a better
way: GitHub Actions.
Using GitHub Actions (GitHub’s flavor of CI/CD automation), we can automate the process as follows:
- Push local changes to your Source repo’s
masterbranch - A GitHub Action Workflow will then:
- Clone the Source repo
- Build the Hugo website
- Clone the GH Pages repo
- Copy the static site files from Source repo to Pages repo
- Push those changes to the Source repo
- GitHub Pages publishes the static files that were pushed to the Pages repo
GitHub Action Workflow
So how do we do this? Well it all relies on GitHub Actions to do all the work.
We use GitHub Actions by defining a Workflow in the form of a yaml file in
the .github/workflows directory of the repository. For our present use case,
the file looks like this:
name: Build and Deploy

on:
  push:
    branches:
      - master

jobs:
  build:

    runs-on: ubuntu-latest

    steps:
    - name: Checkout master
      uses: actions/checkout@v1
      with:
        submodules: true

    - name: Hugo Deploy GitHub Pages
      uses: benmatselby/hugo-deploy-gh-pages@master
      env:
        HUGO_VERSION: 0.68.3
        TARGET_REPO: jrwrigh/jrwrigh.github.io
        TOKEN: ${{ secrets.TOKEN }}
        CNAME: www.jameswright.xyz
I’ll go over the different parts, but you can find more details about GitHub
Actions GitHub Documentation
here
and about the syntax of the Workflow yaml file
here
Name
name: Build and Deploy
This is simply the name of the GitHub Workflow that you’re going to make. This is what will show up in the GitHub Workflows dashboard of the repository.
Trigger
on:
  push:
    branches:
      - master
This tells GitHub when to run the Workflow. Here, we want it to trigger on a push to the master branch.
Build Job
jobs:
  build:

    runs-on: ubuntu-latest

    steps:
This section starts the declaration of what the Workflow should actually do.
A Workflow is made up of individual jobs. Here, we only need one job: build.
First, the operating system is specified for the build job. The proceeding
steps rely on access to apt-get to install the required software to build the
static site files, so Ubuntu is chosen.
After this, the steps for the build job are listed. These are what define
what the job actually does. These steps can be defined different ways, but
we’re going to be using only Actions. Actions are just predefined scripts that
are published on GitHub’s marketplace (though you can reference unpublished
ones if they’re in a public repository).
Checkout Action
    - name: Checkout master
      uses: actions/checkout@v1
      with:
        submodules: true
This simply clones (or checkout in GitHub’s nomenclature) the Source repository to the container. It is one of GitHub’s default actions.
Note: The submodules: true is quite important, as the Wowchemy theme
runs as a submodule in your Source repository. If that wasn’t set, Hugo
wouldn’t be able to build the site.
Build and Deploy Action
    - name: Hugo Deploy GitHub Pages
      uses: benmatselby/hugo-deploy-gh-pages@master
      env:
        HUGO_VERSION: 0.68.3
        TARGET_REPO: jrwrigh/jrwrigh.github.io
        TOKEN: ${{ secrets.TOKEN }}
        CNAME: www.jameswright.xyz
And here is where the magic happens. To actually deploy the Hugo site to the GitHub Pages repository, we use Ben Selby’s Hugo Deployment GitHub Action. This will:
- build the Hugo site,
- clone the GH Pages repository,
- copy the static site files to the Pages repository, and
- finally push those changes.
There are a few options for this Action, which are all set with environment
variables (hence the env:). In detail, the options are:
HUGO_VERSION- Version of Hugo used to build the website
- Can usually just be set to whatever version you use on your local machine
TARGET_REPO- The repository were the static site files should be copied/pushed to.
- This would be the Pages repository, in the format of
[User]/[Repository Name]
TOKEN- The GitHub personal access token (PAT) for your Pages repository to push changes.
- Further discussed in the Secret Token Setup section.
CNAME- The contents of this variable are copied into a file called
CNAMEand placed in the Pages repo. - The
CNAMEfile is used if you setup a custom domain name for your website. - See GitHub documentation for more info on custom domain names for GitHub Pages.
- The contents of this variable are copied into a file called
Secret Token Setup
In order to push to the GH Pages repository, the GitHub Action needs to have
appropriate credentials. This is done through a personal access token (PAT),
which is a cryptographic key that can be used instead of login credentials for
performing user-restricted operations on a remote repository (such as git push).
Since this replaces login information, it’s probably obvious that the PAT is very sensitive for privacy reasons. So to allow GitHub Actions to have access to this token without having it publicly published, we store it as a “secret” in the Source repo.
Generate Personal Access Token
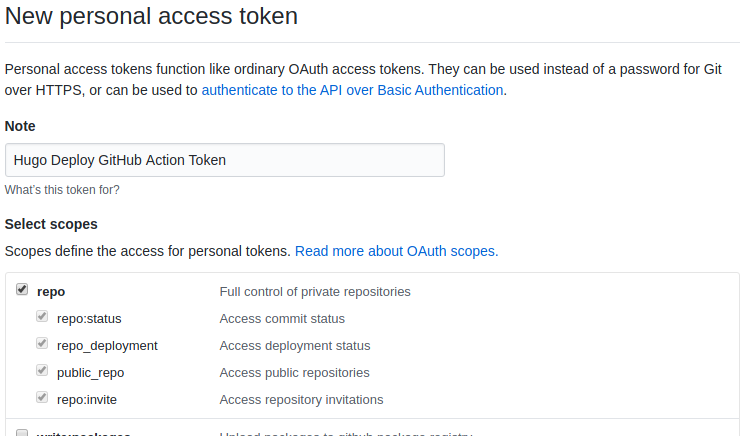
Detailed documentation for generating a personal access token (PAT) for yourself can be found here. I recommend following the steps listed in the documentation to generate the PAT. To make the PAT valid for our purposes, you need to set the access settings to be full for the repositories as seen in the image below:
Once you hit generate, keep an eye on the alphanumeric string that is
displayed. That’s the PAT.
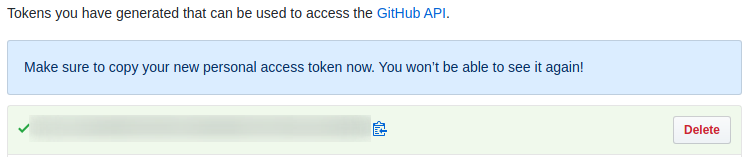
Copy this string somewhere safe for right now. Once the PAT is put into a secret and you’ve verified that everything works, I’d recommend you don’t store the key anywhere. If for whatever reason you end up needing a PAT later, it’s easy to create a new one.
Create Secret in Source Repository
Now that we have the PAT, we need to let the GH Action have access to it via the Source repo’s secrets. I recommend following GitHub’s documentation on creating a secret for GitHub Actions.
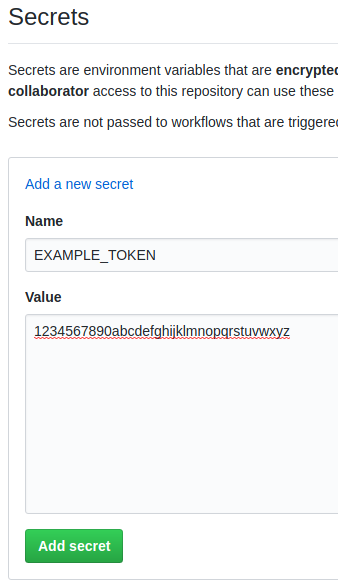
The secret creation screen looks like this, where “Value” is where you copy your PAT to:
Note that the name setup above must be the same as that used in the Workflow
yaml script:
TOKEN: ${{ secrets.EXAMPLE_TOKEN }}
Wrapping Up
Now that you have your secret token setup and your Workflow YAML file in place, you’re all set for auto-publishing. Your Hugo site on GitHub Pages.
If you find any inaccurate information on the page, feel free to hit the “Edit Page” command below and submit a pull request with updates. If you have any questions about getting this setup, feel free to contact me. I’m not an expert by any means, but I’ll do my best.